This post may contain affiliate links for your convenience. As an Amazon Associate, A Personal Organizer, LLC earns from qualifying purchases.
Kitchen Organizing
Even if cooking is not your favorite activity in the household, we must agree that a well-organized kitchen makes life easier, less stressful, and more economical.
Maintaining a clean kitchen will also be easier when you don’t have to deal with clutter on the countertops, messy containers, or spills in the fridge or pantry.
Planning healthy, home-made meals becomes a breeze when we know what’s in our pantry and freezer.
So, let’s see how you can get your kitchen organized and start enjoying that space, even if it’s just for a coffee break!
PS: I am not known for my cooking skills. However, I joke that I’m excellent at keeping the kitchen and the pantry organized so the chef can do what he does best—got it?
Identify the different activities you perform in the kitchen to help you get organized.
– Food storage
– Pantry, Fridge & Bulk Storage
– Food prep
– Cooking
– Washing
– Storage
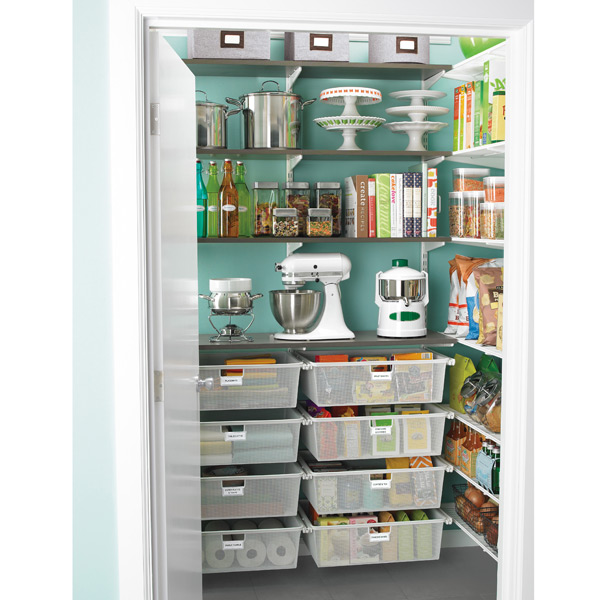
Today, let’s explore some ideas on how to optimize the pantry’s performance!
Food Storage:
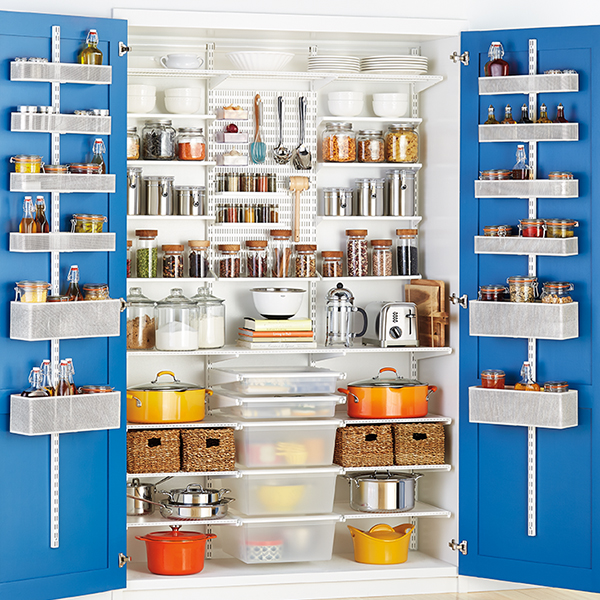
Maintaining an organized pantry is essential to make your life simpler when it’s time to cook dinner or just put a sandwich together for a snack.
It allows you to see what you have in storage, avoid waste by using it before the expiration date, and reduce trips to the supermarket. Not to say it will save money, as you won’t buy duplicates or unnecessary ingredients. Bonus benefit? It will avoid upsets when you decide to prepare dinner only to find out you don’t have all the necessary ingredients.
However, to make this work, assign a time to empty, clean, and then reorganize the pantry.
Depending on the size of your pantry, we may be talking anywhere from 2 to 3 hours to a whole morning.
First, remove all the items in your pantry and organize them into “families”. As you empty the pantry, go through each item and check for the expiration date. Clean the cans and containers, and then place them on your counter. If it’s too busy, open a sheet on the floor and work right there.
[clickToTweet tweet=”When it comes to organizing, everybody has a family and every family has a home. Use my easy to follow steps to organize your pantry! #organizing #kitchen #proorganizer” quote=”When it comes to organizing, everybody has a family and every family has a home.” theme=”style1″]
How can you create your families:
– Baking Goods
– Bread & Cereal
– Breakfast – maple syrup, coffee, cocoa, teas, jelly, honey, Peanut Butter, Nutella, etc.
– Canned Goods
– Dry Goods (Flour, Sugar, for example)
– Grains
– Pasta
– Snacks
– Spices
Now that you have everybody lined up and assigned to a group, let’s go back to your pantry and clean the whole area.
Of course, you can make this a bigger project by painting the inside with a nice, happy color, lining the shelves, adding trim to each shelf, installing lighting, or simply adjusting the height of your shelves.
Place your least-used items on the very top shelf or the lowest one. Heavy items should also be placed lower, so they don’t break your back when you’re retrieving them.
Heavy items should also be placed lower, so they don’t break your back when you’re retrieving them. A great way to utilize corners is by placing an extra-large turning table (also known as a lazy Susan) in this area to maximize your space.
Your most frequently used items should be placed at eye level. Think breakfast, grains, and canned goods.
You can use containers to house all the “families”. You can use anything, from plastic bins to beautiful, natural fiber baskets. Whatever fancy your eyes and budget best, go for it.
I recommend BPA-free plastic containers as they are easy to clean on an ongoing basis, allow you to check your “inventory quickly”, and tend to be less expensive!
Now that you know how much you have of each item, if you decide to install organizing gadgets, you can make your shopping list.
But wait, before you go, take all the necessary measurements to buy items that will fit in your space.
Measure each shelf: how deep, how wide, and the space between each of them. Create a drawing of your pantry, including its measurements. When going on your shopping trip, bring your list and a measuring tape!