This post may contain affiliate links for your convenience. As an Amazon Associate, A Personal Organizer, LLC earns from qualifying purchases.
The Organized Pantry You’ll Want to Stare At All Day!
If you’ve been on the ‘gram recently you have probably noticed the moment that organized pantries are having right now.
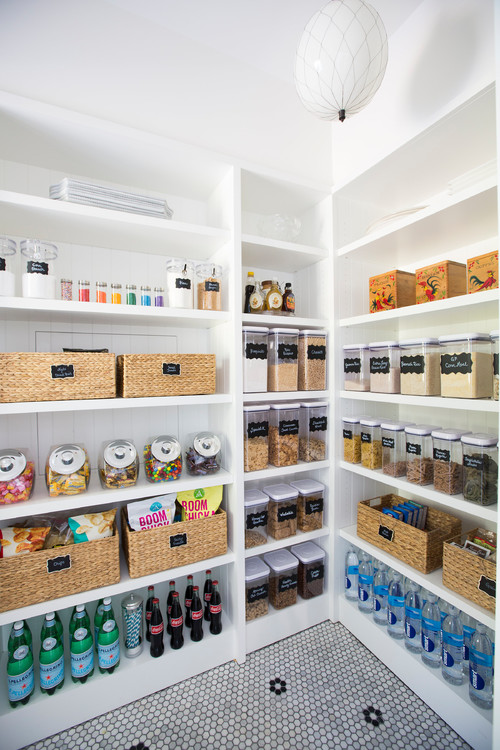
If you would love to have an organized pantry that is a joy to look at, here are a few tips to recreate that #pantrygoals look in your own home!

Step-by-Step Pantry Organizing: Start Fresh
As with any organizing project take everything out of your pantry. Wipe down your shelves with food save cleaner. Throw out any food that is expired. Donate any dry goods that are still fresh, but you are not planning on using. Step back and look at the space you have.
Step-by-Step Pantry Organizing: Plan
Once your pantry is completely cleared of its contents and wiped down, you can start to make a plan of how you are going to use this valuable space. First, consider your shelf space; how much space do you have? What items can possibly fit on the height of certain shelves?
Next, look at what you have. See if there is currently enough shelving to store everything you need. If there is not, consider adding storage if you have room. Also, consider the size of the items you have, vs. the height and width of your shelves. Now is a good time to move shelves around if your pantry allows for it.
Now, plan to place your most used items front and center and then work your way out from there.
Step-by-Step Pantry Organizing: Categorize
First, divide up available shelf space by category. This will allow you to find what you need easily, and let you see when you are out of an important staple. Start by placing everyday items in the center on shelves you can easily access.
Next, divide what space is left among the rest of the items you need to store by category and then prioritize their use.
View this post on Instagram
Tell me if this isn’t the cuttest baby -and most organized cookie jars!- of all?
Make a space for special items that are not necessarily dry goods or even food, like
wine, coffee and teas, and cookbooks.
Step-by-Step Pantry Organizing: Choose Your Containers
One of the common themes of Instagram- worthy pantries is that they all feature wonderful containers, jars, and baskets.
Varying texture and sizes help add dimension to a pantry and give it a high-end look.
View this post on Instagram
Not only do containers and baskets add beauty, but they also add a tremendous amount of function.
Baskets are wonderful to corral smaller items and makes it easier to take things out and put them away.
Clear containers with attractive labels make for a streamlined, uniform look and let you see exactly what you have and how much you have of it.
View this post on Instagram
Step-by-Step Pantry Organizing: Swap Out Packaging and Add Labels
When you get home from shopping, upgrade the look and function of your pantry in yet another way by removing food from its original packaging and storing and organizing them in glass containers with pretty labels.
If you are looking for attractive labels for the many clear containers in your pantry, they get quite pricey. Consider making your own labels that you can completely customize to your style with a Cricut machine. Check out my in-depth tutorial on how to use a Cricut to create beautiful labels for your projects at a fraction of the store-bought cost.
Step-by-Step Pantry Organizing: Consider Door Storage
When considering storage options don’t forget your pantry door!
This space often goes unused, and if it is done well, can really add a huge amount of storage space to your pantry. Pantry doors are a great way to store canned goods and other items that have a smaller profile.
I personally love to install the Elfa door storage system by The Container Store which has several accessories for every type of need.

Another great addition to a pantry door is a list. Whether it is a whiteboard, a chalkboard, or simply a paper list attached to the door, it is very useful to have a place to immediately write down things that need to be replenished all in one convenient place so you don’t forget later.
Three Ways To Do Your Pantry Makeover
Are you ready for your pantry makeover? Here are three different ways you can upgrade your pantry game this week!
Quick Fix: If you don’t want to dive into the deep clean right now, here are a few things that will give you a pantry quick-fix. Set yourself a timer for 30 minutes. Go through your pantry shelf by shelf and get rid of anything that is expired or that you don’t really need or use (donate dry goods if there is a drive near you). Neatly arrange the items on your shelves, like with like. Make a list of things you need to stock up on. This will put you in the perfect place to head into that deep clean when you are ready, and will also make your pantry instantly less cluttered and more useful.
View this post on Instagram
Deep Clean: If you are going for the deep clean, simply go through the steps in this post. Clear out the pantry, clean it out, wipe everything down, invest in some new containers, make or buy some labels, plan your shelf space, and snap a pic (and share it with us @apersonalorganizer on IG!) of your newly organized swoon-worthy pantry
Personal Reset: They say you eat what you see. Consider your current eating habits. Take a look around your pantry. Could you stock some healthier items? And could you move those healthier choices up front and center so they are the first things you reach for at mealtimes and snack times? Give this a try for a simple and healthy reset.
Which Pantry fix are you going to do? Let me know in the comments below!


